Tuesday, December 10, 2013

Entity Framework Power Tools

Entity Framework Power Tools (currently in beta 3) has been released. EF Power Tools is useful mainly in reverse engineering and generating read-only entity data model for code-first.

Download and install Power Tools from Visualstudiogallery

After installing it, when you right click on the C# project, you can see “Entity Framework” option in the context menu.

When right-clicking on a C# project, the following context menu functions are supported:
  • Reverse Engineer Code First - Generates POCO classes, derived DbContext and Code First mapping for an existing database.
  • Customize Reverse Engineer Templates - Adds the default reverse engineer T4 templates to your project for editing.

automated migration in code first

When right-clicking on a file containing a derived DbContext class, the following context menu functions are supported:
  • View Entity Data Model (Read-only) - Displays a read-only view of the Code First model in the Entity Model Designer.
  • View Entity Data Model XML - Displays the EDMX XML representing the underlying Code First model.
  • View Entity Data Model DDL SQL - Displays the DDL SQL corresponding to the SSDL in the underlying EDM Model.
  • Generate Views - Generates pre-compiled views used by the EF runtime to improve start-up performance. Adds the generated views file to the containing project.

automated migration in code first

When right-clicking on an Entity Data Model (*.edmx) file, the following context menu function is supported:
  • Generate Views - Generates pre-compiled views used by the EF runtime to improve start-up performance. Adds the generated views file to the containing project.

automated migration in code first

Visit MSDN for step-by-step demonstrates the tasks that you can accomplish with the EF Power Tools.

Code-based Migration

Code based migration is useful when you want more control on migration i.e. set default value of the column etc.

Code first has two commands for code based migration:

  1. Add-migration: It will scaffold the next migration for the changes you have made to your domain classes
  2. Update-database: It will apply pending changes to the database based on latest scaffolding code file you create using "Add-Migration" command

Assume that you have Student and Course entity classes initially and you want to use code based migration for your application. So before running above commands you must enable migration for your application by using enable-migrations commands in package manger as we did it for automatic migration. This will create configuration file same as automated migration. Also, you need to set database initializer in context class:
     
public class SchoolDBContext: DbContext 
    {
        public SchoolDBContext(): base("SchoolDBConnectionString") 
        {
            Database.SetInitializer(new MigrateDatabaseToLatestVersion<SchoolDBContext, SchoolDataLayer.Migrations.Configuration>("SchoolDBConnectionString"));
            
        }

        public DbSet<Student> Students { get; set; }
        public DbSet<Course> Courses { get; set; }
        
        protected override void OnModelCreating(DbModelBuilder modelBuilder)
        {

            base.OnModelCreating(modelBuilder);
        }

    }
        
Now, you have to create scaffold code file which consist your database requirement from your existing domain classes. You can do this by running “add-migration" command in package manger. (from Tools → Library Package Manager → Package Manager Console). You have to pass the name parameter which will be part of code file name.

automated migration in code first

Add-Migration command Syntax:
    
    Add-Migration [-Name] <String> [-Force]
      [-ProjectName <String>] [-StartUpProjectName <String>]
      [-ConfigurationTypeName <String>] [-ConnectionStringName <String>]
      [-IgnoreChanges] [<CommonParameters>]
 
    Add-Migration [-Name] <String> [-Force]
      [-ProjectName <String>] [-StartUpProjectName <String>]
      [-ConfigurationTypeName <String>] -ConnectionString <String>
      -ConnectionProviderName <String> [-IgnoreChanges] [<Common Parameters>]
        
You can see that this command has created new file in Migration folder with name parameter you passed in command with timestamp prefix:

code based migration in code first

After creating above file using add-migration command, you have to update the database. You can create or update the database using “update-database” command. You can use –verbose to see what’s going on in the database:

code based migration in code first

Update-Database command syntax:
    
    Update-Database [-SourceMigration <String>]
      [-TargetMigration <String>] [-Script] [-Force] [-ProjectName <String>]
      [-StartUpProjectName <String>] [-ConfigurationTypeName <String>]
      [-ConnectionStringName <String>] [<CommonParameters>]
 
    Update-Database [-SourceMigration <String>] [-TargetMigration <String>]
      [-Script] [-Force] [-ProjectName <String>] [-StartUpProjectName <String>]
      [-ConfigurationTypeName <String>] -ConnectionString <String>
      -ConnectionProviderName <String> [<CommonParameters>]
        
At this point, database will be created or updated.

Now suppose you added more domain classes. So before running application, you have to create scaffold file for new classes by executing "Add-Migration" command. Once it creates the file, update the database using Update-Database command. So this way you have repeat Add-Migration and Update-Database command each time when you make any changes in your domain classes.

Rollback Database change:

Suppose you want to rollback database schema to any of the previous state then you can use Update-database command with –TargetMigration parameter as below:

update-database -TargetMigration:"First School DB schema"

Use "get-migration" command to see what migration have been applied.

Note: Use get-help command for add-migration and update-database command to see what are the parameters we can pass with this command.

Automated Migration

Entity framework 4.3 has introduced Automated Migration so that you don’t have to maintain database migration manually in code file for each change you make in your domain classes. You just need to run command in Package Manger Console and you will be done.

Let’s see how you can use automated migration.

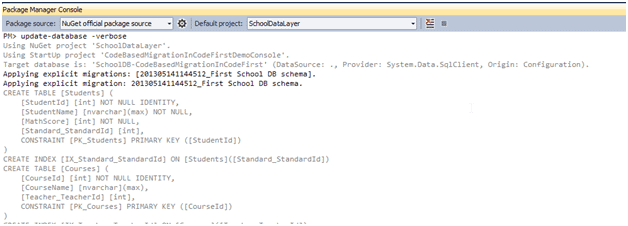
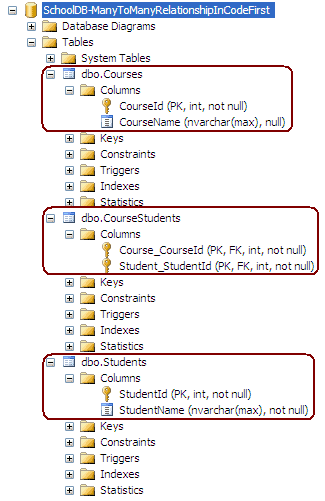
As you know, you don’t have any database when you start writing code first application. For example, we start writing application with Student and Course entity classes. But before running application that is before creating database first time, you have to enable automated migration by running ‘enable-migrations’ command in Package Manager Console as below:

First, open package manager console from Tools → Library Package Manager → Package Manager Console and then run "enable-migrations –EnableAutomaticMigration:$true" command (make sure that default project is the project where your context class is)

automated migration in code first

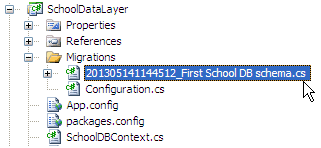
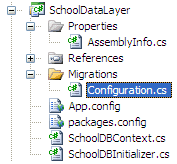
Once command runs successfully, it creates internal sealed Configuration class in Migration folder in your project:

automated migration in code first

If you open and see this class then you will find AutomaticMigrationsEnabled = true in the constructor.
     
    internal sealed class Configuration : DbMigrationsConfiguration<SchoolDataLayer.SchoolDBContext>
    {
        public Configuration()
        {
            AutomaticMigrationsEnabled = true;
        }

        protected override void Seed(SchoolDataLayer.SchoolDBContext context)
        {
            //  This method will be called after migrating to the latest version.

            //  You can use the DbSet<T>.AddOrUpdate() helper extension method 
            //  to avoid creating duplicate seed data. E.g.
            //
            //    context.People.AddOrUpdate(
            //      p => p.FullName,
            //      new Person { FullName = "Andrew Peters" },
            //      new Person { FullName = "Brice Lambson" },
            //      new Person { FullName = "Rowan Miller" }
            //    );
            //
        }
    }
        
You also need to set the database initializer in context class with new db initialization strategy MigrateDatabaseToLatestVersion as below:
    
    public class SchoolDBContext: DbContext 
    {
        public SchoolDBContext(): base("SchoolDBConnectionString") 
        {
            Database.SetInitializer(new MigrateDatabaseToLatestVersion<SchoolDBContext, SchoolDataLayer.Migrations.Configuration>("SchoolDBConnectionString"));
            
        }

        public DbSet<Student> Students { get; set; }
        public DbSet<Course> Courses { get; set; }
        
        protected override void OnModelCreating(DbModelBuilder modelBuilder)
        {

            base.OnModelCreating(modelBuilder);
        }

    }
        
As you can see in the above code that we have passed Configuration class name which was created by command, along with context class name.

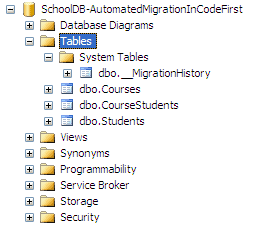
Now you are set for automated migration. It will automatically take care of migration as and when you change the model. Run the application and see the created database:

automated migration in code first

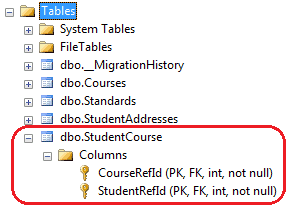
You will find that it has created one system table __MigrationHistory along with other tables. This is where automated migration maintains the history of database changes.

Now let’s add Standard entity class and run the application again and see that it has automatically created Standard table.

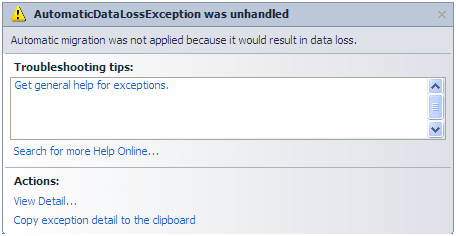
Wait a minute, this will take care if you add new entity class or remove entity class but what about adding or removing properties from any of the entity class? To check that, let’s remove Description property from Standard class and run the application.

Oops.. you will get an error message:
automated migration in code first

This is because you will lose data in description column if you remove it from Standard class. So to handle this kind of scenario you have to set AutomaticMigrationDataLossAllowed = true in configuration class constructor along with AutomaticMigrationsEnabled = true.

Note: You can find more information about parameters we can pass to enable-migrations command using “get-help enable-migrations” command. For detailed help use “get-help enable-migrations –detailed”

So thus you can handle migration automatically.

Migration in Code-First

Entity framework code first has different database initialization strategies prior to EF 4.3 like CreateDatabaseIfNotExists, DropCreateDatabaseIfModelChanges or DropCreateDatabaseAlways. However, there were some problems with these strategies, for example if you already have data (other than seed data) or existing Stored Procedures, triggers etc in your database then these strategies used to drop the entire database and recreate it and so you lose the data and other db objects.

Entity framework 4.3 has introduced migration that automatically updates database schema when your model changes without losing any existing data or other database objects. It uses new database initializer called MigrateDatabaseToLatestVersion.

There is two kind of Migration:
  1. Automated Migration
  2. Code based Migration

Let’s see these migrations in detail in the next chapters.

Configure Many-to-Many relationship

We are going to configure Many-to-Many relationship between Student and Course entity classes.

Configure Many-to-Many relationship using DataAnnotation:

Student class should have collection navigation property for Course and Course should have collection navigation property for student which will create Many-to-Many relationship between student and course as below:
     
    public class Student
    {
        public Student() { }

        public int StudentId { get; set; }
        [Required]
        public string StudentName { get; set; }

        public int StdandardId { get; set; }
        
        public virtual ICollection<Course> Courses { get; set; }
    }
        
    
    public class Course
    {
        public Course()
        {
            this.Students = new HashSet<Student>();
        }

        public int CourseId { get; set; }
        public string CourseName { get; set; }

        public virtual ICollection<Student> Students { get; set; }
    }
        
Above code will create following database where code first will create third joining table CourseStudent which will consist PK of both the tables ie. StudentId & CourseId:

one-to-one relationship in code first

Configure Many-to-Many relationship using Fluent API:

You can use Fluent API to configure Many-to-Many relationship between Student and Course as following:
   
    protected override void OnModelCreating(DbModelBuilder modelBuilder)
    {

       modelBuilder.Entity<Student>().HasMany<Course>(s => s.Courses).WithMany(c => c.Students).Map(c =>
        {
            c.MapLeftKey("Student_id");
            c.MapRightKey("Course_id");
            c.ToTable("StudentAndCourse");
        });

        base.OnModelCreating(modelBuilder);
    }
        
As you can see in above code that we are mapping left key (key column of Student class)with “Student_id” and right key (key column of Course class) with “Course_id” of table "StudentAndCourse".

This will create new joining table “StudentAndCourse” with two PK which is also FK as below:

one-to-one relationship in code first

Configure One-to-Many Relationship

We are going to configure One-to-Many relationship between Student and Standard as many students are studying in one standard.

Configure One-to-Many relationship using DataAnnotation:

Student entity class has reference property of Standard class with StandardId foreignKey proeprty and Standard class has collection property for Students. So this DataAnnotation will result in One-to-Many relationship.
     
    public class Student
    {
        public Student() { }

        public int StudentId { get; set; }
        [Required]
        public string StudentName { get; set; }

         public int StdandardId { get; set; }
        
        public virtual Standard Standard { get; set; }
    }
        
    
    public class Standard
    {
        public Standard()
        {
            Students = new List<Student>();
        }
        public int StandardId { get; set; }
        public string StandardName { get; set; }
        public string Description { get; set; }

        public virtual ICollection<Student> Students { get; set; }
    }
        
Configure One-to-Many relationship using Fluent API:

Suppose your Student and Standard entity class doesn’t follow code first conventions and have different property names, for example:
   
    public class Student
    {
        public Student(){ }

        public int StudentId { get; set; }
        [Required]
        public string StudentName { get; set; }

        //StdId is not following code first conventions name
        public int StdId { get; set; }

        public virtual Standard Standard { get; set; }
    }
        
    
    public class Standard
    {
        public Standard()
        {
            StudentsList = new List<Student>();
        }
        public int StandardId { get; set; }
        public string StandardName { get; set; }
        public string Description { get; set; }

        public virtual ICollection<Student> StudentsList { get; set; }
    }
        
So you can use Fluent API to configure One-to-Many relationship between Student and Standard entity classes:
    
   protected override void OnModelCreating(DbModelBuilder modelBuilder)
    {
            //one-to-many 
            modelBuilder.Entity<Student>().HasRequired<Standard>(s => s.Standard)
            .WithMany(s => s.StudentsList).HasForeignKey(s => s.StdId);

    }
        
Other possible way:
    
    protected override void OnModelCreating(DbModelBuilder modelBuilder)
    {
            //one-to-many
            modelBuilder.Entity<Standard>().HasMany<Student>(s => s.StudentsList)
            .WithRequired(s => s.Standard).HasForeignKey(s => s.StdId);
    }
        
Above code will create following database:
one-to-one relationship in code first

Entity Data Model in designer will look like below:
one-to-one relationship in code first


Download Sample Project:

Download Entity Framework Sample Project

Configure One-to-One Relationship

We are going to configure One-to-One relationship between Student and StudentAddress. As you may know that one to one relationship happens when primary key of one table becomes PK & FK in another table. Here, StudentId is a Primary key of Student table so StudentId should be PK and FK in StudentAddress table in order to have one to one (one to zero or one) relationship between them.

Configure one to zero or one relationship using DataAnnotation:
     
    public class Student
    {
        public Student() { }

        public int StudentId { get; set; }
        [Required]
        public string StudentName { get; set; }

        [Required]
        public virtual StudentAddress StudentAddress { get; set; }

    }
        
    
    public class StudentAddress 
    {
        [Key, ForeignKey("Student")]
        public int StudentId { get; set; }
        
        public string Address1 { get; set; }
        public string Address2 { get; set; }
        public string City { get; set; }
        public int Zipcode { get; set; }
        public string State { get; set; }
        public string Country { get; set; }

        public virtual Student Student { get; set; }
    }
        
As you can see in above Student and StudentAddress class, we haven’t done anything special in Student class because StudentId follows the conventions so it will become PK. Now, we use Key and ForeignKey attribute for StudentId in StudentAddress class to mark it as PK as well as FK. So thus it will create one-to-one relationship between Student and StudentAddress.

Configure One-to-One relationship using Fluent API:
   
    protected override void OnModelCreating(DbModelBuilder modelBuilder)
    {
        modelBuilder.Entity<StudentAddress>()
            .HasKey(e => e.StudentId);
        modelBuilder.Entity<StudentAddress>()
                    .Property(e => e.StudentId)
                    .HasDatabaseGeneratedOption(DatabaseGeneratedOption.None);
        modelBuilder.Entity<StudentAddress>()
                    .HasRequired(e => e.Student)
                    .WithRequiredDependent(s => s.StudentAddress);

        base.OnModelCreating(modelBuilder);
    }
        
Above code will create following database:

one-to-one relationship in code first

You can check the relationship between Student and StudentAddress in the database as below:

one-to-one relationship in code first

If you create entity data model of created database then it will look like this:

one-to-one relationship in code first

You will learn how to create one-to-many relationship in the next chapter.

Download Sample Project:

Download Entity Framework Sample Project

Fluent API Class Hierarchy

Below image shows hierarchy of important Fluent API classes:

fluent api

As you can see that I have separated classes by levels eg. DbModelBuilder is level 0 class because it’s main class in Fluent API configuration. EntityTypeConfiguration is Level 1 class because we can set relationship between entities using this class. ManyNavigarionConfiguration, OptionalNavigationPropertyConfiguration and RequiredNavigationPropertyConfiguration are Level 2 classes which set some additional configuration between entities.

So, Level 1 and Level 2 classes can be used to configure relationship between the entities that will be mapped to database tables. Level 3 & 4 can be used to configure additional mapping between the entities.

Next chapters will explain how to use these classes to configure One-to-One, One-to-Many and Many-to-Many relationships using these classes.

EntityTypeConfiguration Class in Code-First

It is important to understand EntityTypeConfiguration class because it is an important class that allows configuration to be performed for an entity type in a model. It can be obtained by calling Entity method of DbModelBuilder class:

EntityTypeConfiguration

EntityTypeConfiguration has following important methods:

Method NameReturn TypeDescription
HasKey<TKey>EntityTypeConfigurationConfigures the primary key property(s) for this entity type.
HasMany<TTargetEntity>ManyNavigationPropertyConfigurationConfigures a many relationship from this entity type.
HasOptional<TTargetEntity>OptionalNavigationPropertyConfigurationConfigures an optional relationship from this entity type. Instances of the entity type will be able to be saved to the database without this relationship being specified. The foreign key in the database will be nullable.
HasRequired<TTargetEntity>RequiredNavigationPropertyConfigurationConfigures a required relationship from this entity type. Instances of the entity type will not be able to be saved to the database unless this relationship is specified. The foreign key in the database will be non-nullable.
Ignore<TProperty>VoidExcludes a property from the model so that it will not be mapped to the database.
MapEntityTypeConfigurationAllows advanced configuration related to how this entity type is mapped to the database schema.
Property<T>StructuralTypeConfigurationConfigures a struct property that is defined on this type.
ToTableVoidConfigures the table name that this entity type is mapped to.

Visit MSDN for more information on EntityTypeConfiguration class.

Fluent API in Code-First

As you have seen in previous chapter that you can configure your domain classes by overriding OnModelCreating method of DBContext in your context class. For example:
    
    public class SchoolDBContext: DbContext 
    {
        public SchoolDBContext(): base("SchoolDBConnectionString") 
        {
        }

        public DbSet<Student> Students { get; set; }
        public DbSet<Standard> Standards { get; set; }
        public DbSet<StudentAddress> StudentAddress { get; set; }
        
        protected override void OnModelCreating(DbModelBuilder modelBuilder)
        {
            //Configure domain classes using Fluent API here

            base.OnModelCreating(modelBuilder);
        }
    }
        

DbModelBuilder is main class by which you can configure domain classes. Configuration done by using the DbModelBuilder API takes precedence over data annotations which in turn take precedence over the default conventions.

DbModelBuilder class has following important property and method:
Property / Method NameDescriptionReturn Type
ConventionsProvides access to the settings of this DbModelBuilder that deal with conventions. You can disable the conventions for the DbModelBuilder. 
Entity<TEntityType>()Registers an entity type as part of the model and returns an object that can be used to configure the entity. This method can be called multiple times for the same entity to perform multiple lines of configuration.EntityTypeConfiguration<TEntityType>

Visit MSDN for more information on DbModelBulder class.

DataAnnotation in Code-First

EF Code first provides set of DataAnnotation attributes which you can apply on your domain classes and properties. You have to include System.ComponentModel.DataAnnotations namespace to use DataAnnotation attributes. DataAnnotation basically includes attributes for server side validations and database related attributes.

Validation Attributes: 

Annotation AttributeDescription
RequiredThe Required annotation will force EF (and MVC) to ensure that property has data in it.
MinLengthMinLength annotation validates property whether it has minimum length of array or string.
MaxLengthMaxLength annotation maximum length of property which in-tern set maximum length of column in the database
StringLengthSpecifies the minimum and maximum length of characters that are allowed in a data field.

Database Schema related Attributes:

Annotation AttributeDescription
TableSpecify name of the DB table which will be mapped with the class
ColumnSpecify column name and datatype which will be mapped with the property
KeyMark property as EntityKey which will be mapped to PK of related table.
ComplexTypeMark the class as complex type in EF.
TimestampMark the property as a non-nullable timestamp column in the database.
ForeignKeySpecify Foreign key property for Navigation property
NotMappedSpecify that property will not be mapped with database
ConcurrencyCheckConcurrencyCheck annotation allows you to flag one or more properties to be used for concurrency checking in the database when a user edits or deletes an entity.
DatabaseGeneratedDatabaseGenerated attribute specifies that property will be mapped to Computed column of the database table. So the property will be read-only property. It can also be used to map the property to identity column (auto incremental column).
InversePropertyInverseProperty is useful when you have multiple relationship between two classes.

DataAnnotation example:
    
    [Table("StudentInfo")]
    public class Student
    {
        public Student(){ }
        
        [Key]
        public int SID { get; set; }

        [Required(ErrorMessage="Student Name is Required" )]
        [Column("Name", TypeName="ntext")]        
        [MaxLength(20), MinLength(2, ErrorMessage="Student name can not be 2 character or less")]
        public string StudentName { get; set; }

        [NotMapped]
        public int? Age { get; set; }

        [ConcurrencyCheck()]
        [Timestamp]
        public Byte[] LastModifiedTimestamp { get; set; }

        public int? MathScore { get; set; }
        
        public int? ScienceScore { get; set; }


        [DatabaseGenerated(DatabaseGeneratedOption.Computed)]
        public int? TotalScore
        {
            get;
            set;

        }
        
        public int StdId { get; set; }

        [ForeignKey("StdId")]
        public virtual Standard Standard { get; set; }
    }
        

Download DataAnnotation Sample project:


Download Entity Framework Code-First Sample Project